Block #8
We’ll be taking it up a notch this month in terms of difficulty. There are lots of partial seams in this block, and the small pieces can be a touch finicky. But just take care to follow the directions step by step, and be mindful and diligent in your piecing and you’ll manage the block with no problems. Before you know it you’ll have wrapped your brain around the concept of partial seams and knowing how they work will open up your design options!
With all of these seams, it’s very important to keep a scant ¼” seam allowance so that your block finishes at 12.5” square.


FABRIC REQUIREMENTS FOR ONE BLOCK
One block finishes 12.5” square.
Based on fabrics that are 42” wide:
Fabric A: (Crossweave - Blue Blue)
1.5” x 23.5” scrap
Fabric B: (Shot Cotton – Galvanized)
1.5” x 15.5” scrap
Fabric C: (Kona Cotton Butterscotch)
1.5” x 10” scrap
Fabric D: (Kona Cotton - Bone)
1.5” WOF strip
4.5” x 5.5” scrap
6.5” x 8.5” scrap
BLOCK NUMBERS FOR QUILTS:
Large Baby Quilt: 48” x 60”: make 20 blocks
Arrange in a 4 x 5 block grid
Lap Quilt: 60” x 72” make 30 blocks
Arrange in a 5 x 6 block grid
Queen Sized Quilt: 96” x 96” make 64 blocks
Arrange in an 8 x 8 block grid
CUTTING INSTRUCTIONS:
Fabric A:
A1 = 1.5” x 1.5”
A2 = 3.5” x 1.5”
A3 = 1.5” x 3.5”
A4= 1.5” x 6.5”
A5 = 8.5” x 1.5”
Fabric B:
B1 = 1.5” x 3.5”
B2 = 1.5” X 1.5”
B3 = 3.5” x 1.5”
B4 = 1.5” x 3.5”
B5 = 3.5” x 1.5”
Fabric C:
C1 = 3.5” x 1.5”
C2 = 1.5” x 1.5”
C3 = 1.5” x 3.5”
C4 – 1.5” x 1.5”
Fabric D:
D1, D2, D3, D4, D5, D6. D8, D10, D12, D14, D16= 1.5” x 1.5”
D7 = 1.5” x 6.5”
D9 = 4.5” x 5.5”
D11, D13 = 6.5” x 1.5”
D15 = 3.5” x 1.5”
D17 = 2.5” x 1.5”
D18 = 6.5” x 8.5”

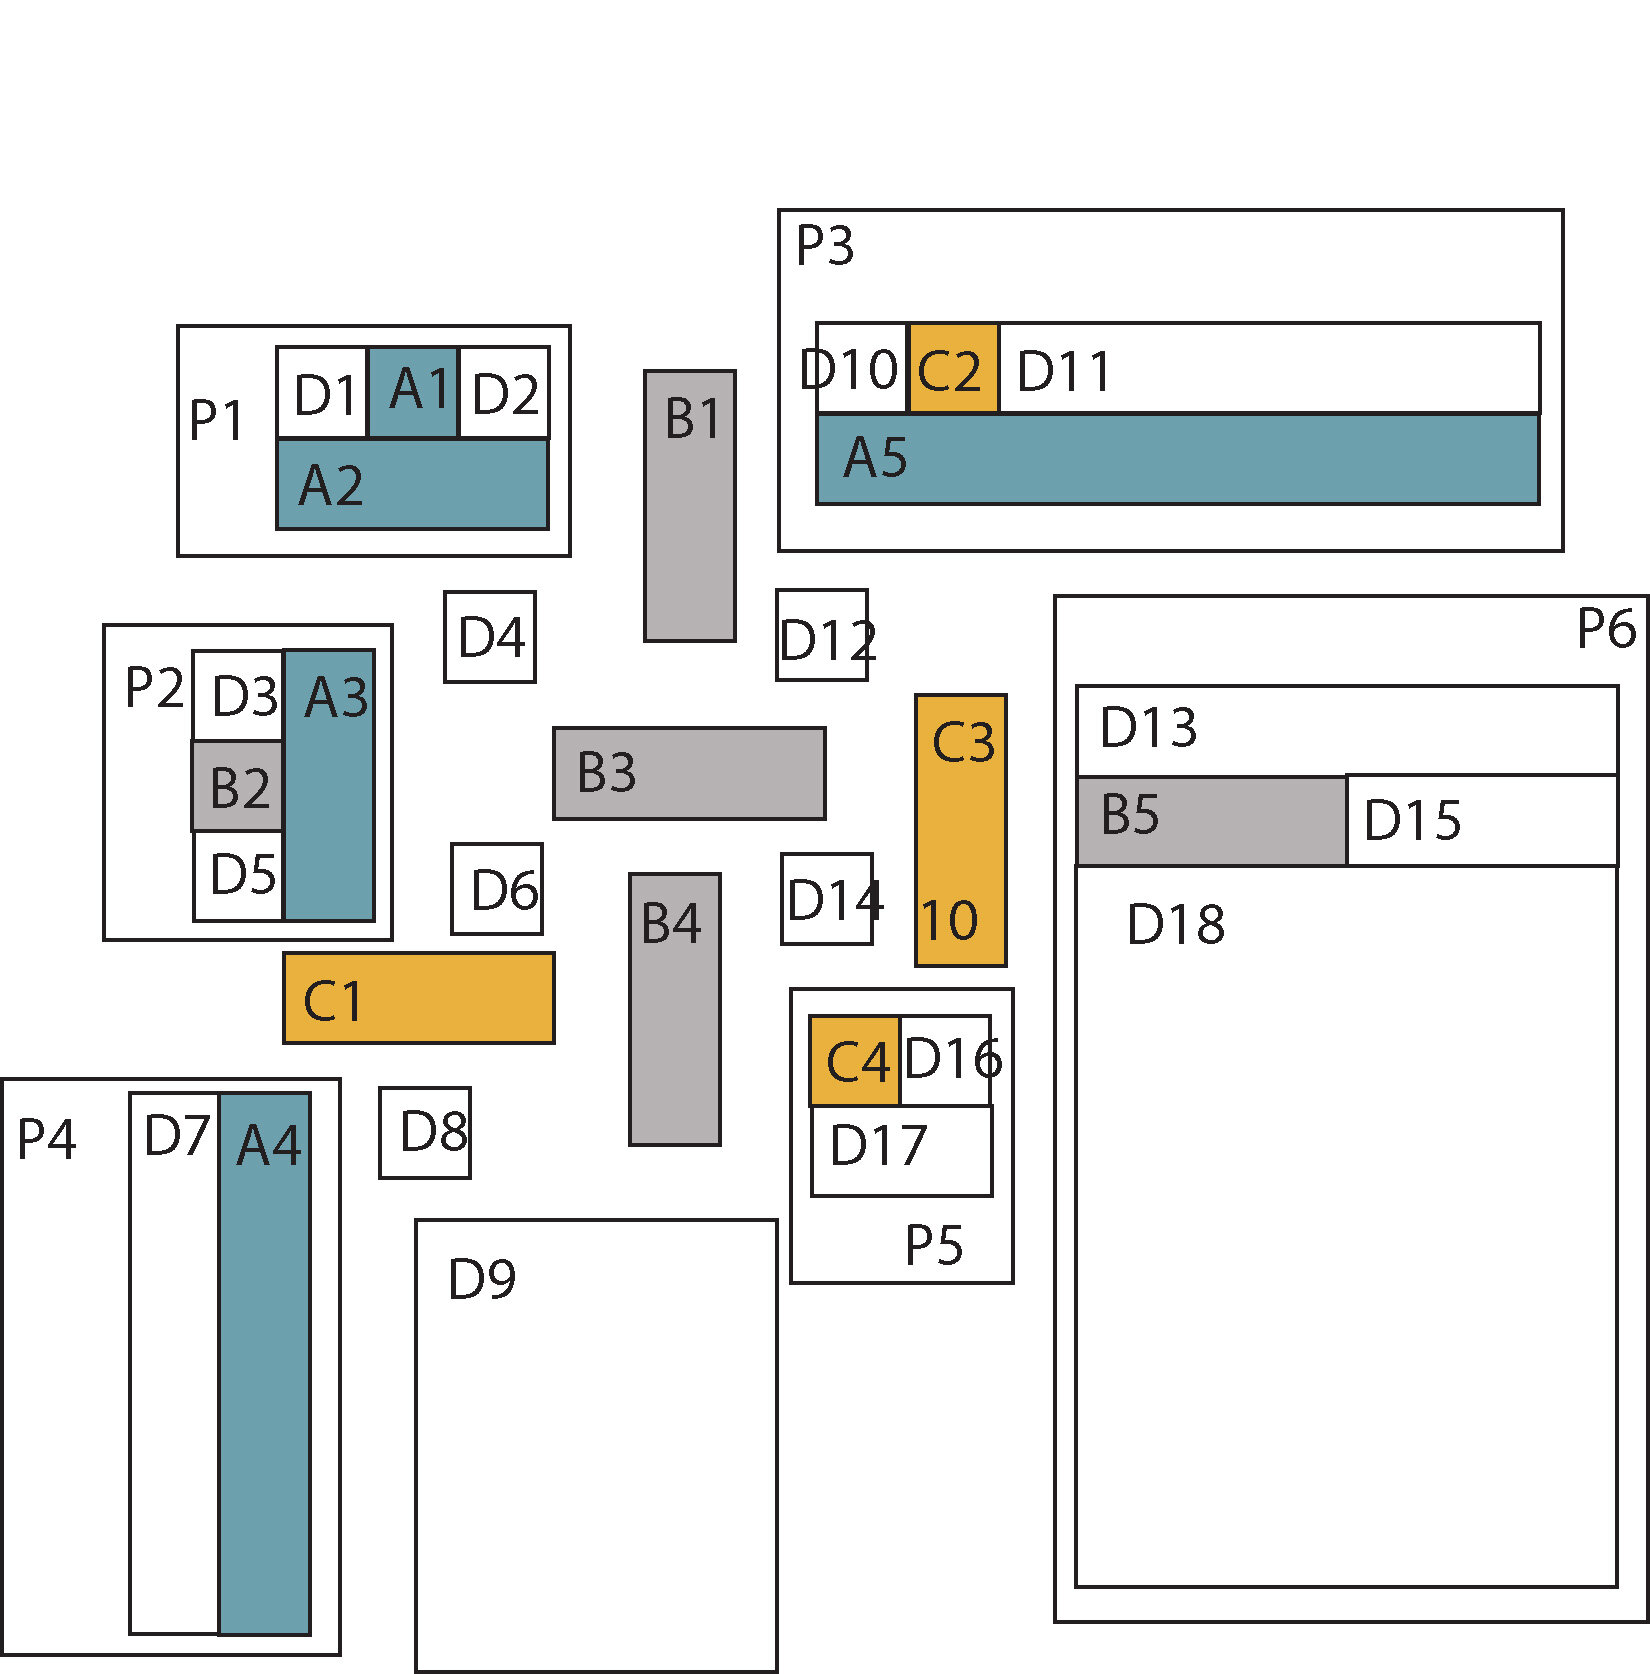
ASSEMBLING THE BLOCK
Always use a scant ¼” seam allowance while piecing and press between every step.
1. First, sew together the portions of the block that don’t require any partial seams.
Assemble D1, A1, D2 and then A2 to create P1
Assemble D3, B2, D5 and then A3 to create P2
Assemble D10, C2, D11 and then A5 to create P3
Assemble D7 and A4 to create P4
Assemble C4, D16 and then D17 to create P5
Assemble B5, D15 and then D13 and D18 to create P6
Now we’ll move on to sewing some partial seams. The directions clearly indicate just where to do this. When you sew a partial seam, sew halfway across, about ¾” of an inch along. I find this gives you the right balance of enough seam sewn and enough left unsewn to work with later.

2. Sew P1 to D4, using a partial seam and leaving the left side of the seam unsewn.
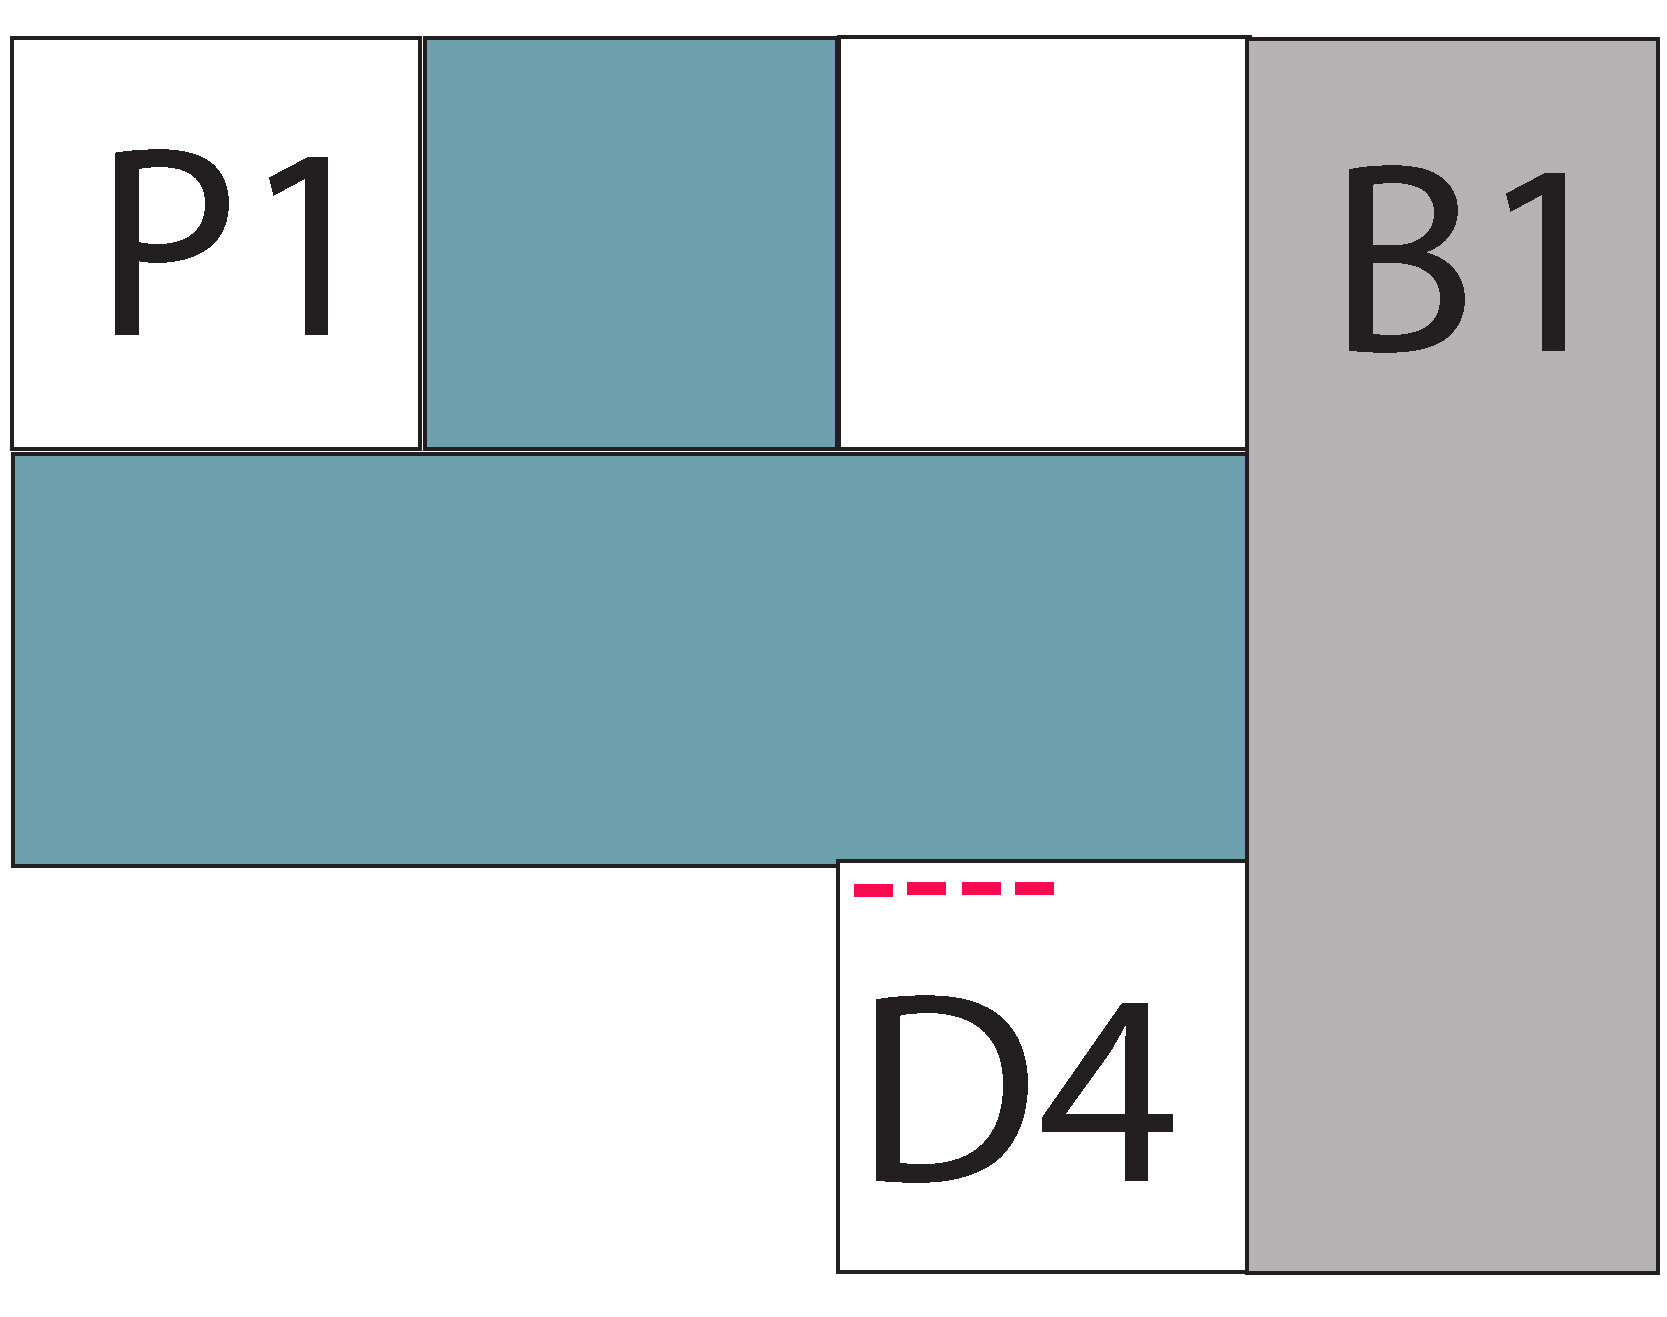
3. Sew B1 to the right side of this piecing and set aside.

4. Sew D6 to P2 using a partial seam and leaving the top part of the seam unsewn.

5. Sew C1 to the bottom of this piecing and set aside.

6. Sew D12 to P3 using a partial seam and leaving the right side of the seam unsewn.

7. Sew this piecing to the right side of the piecing you finished in step 3.

8. Sew B3 to the bottom of this piecing and set aside.

9. Sew D8 to P4 using a partial seam and leaving the bottom half of the seam unsewn.

10. Sew this piecing to the bottom of the piecing from step 5.

11. Sew B4 to the right edge of this piecing and set aside.

12. Sew D14 to P5 using a partial seam and leaving the right side of the seam unsewn.

13. Sew this piecing to the right edge of portion from step 11.
Now you’ll do your first fitting portions together. When closing these partial seams it can be finicky to get your needle in the right place to pick up where you left off but it can be done. Just be patient and take your time to get it right.

You’ll fit together the piecing that you finished in steps 11 and 13. Reference the above graphic as needed.

14. First line up B1 and B4 and sew together that bit, along B3.

15. Next sew the right seam of P2 in
16. Followed by the top seam of P2.

17. Next fit in C3 . First sew in the longer left seam, then the bottom seam.
18. Next sew the top seam, but as a partial seam, leaving the right side of the seam unsewn.
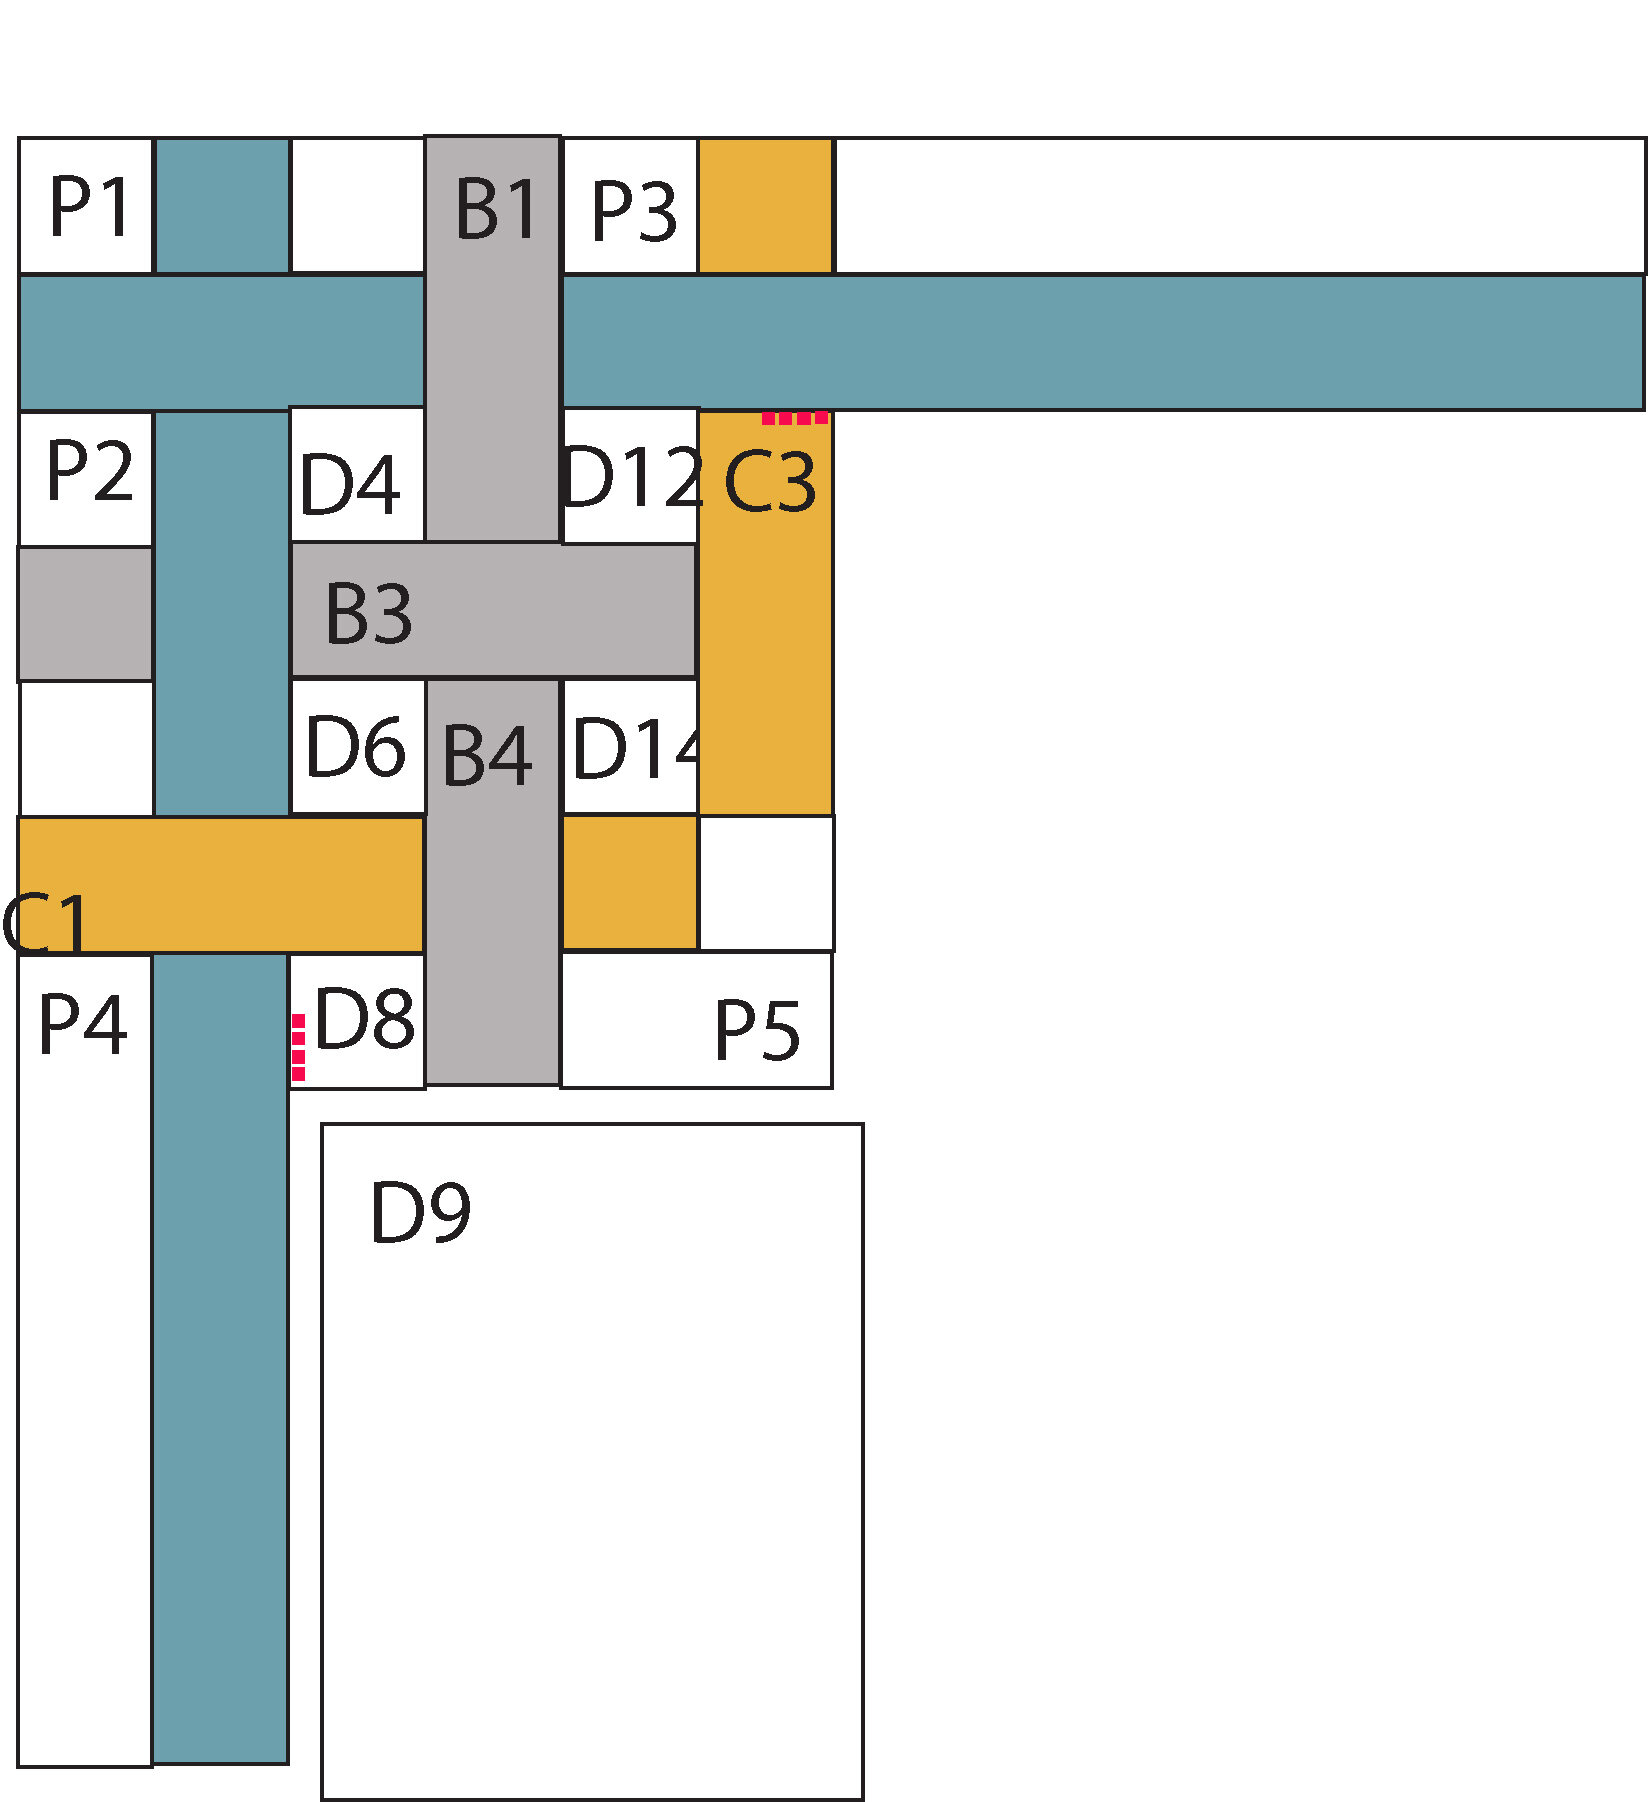
19. Fit in D9 first sewing the top seam, and then the left seam.

20. Finish the block by fitting in P6, first sewing the left seam and then the top seam.
I created some digital quilts using this block in a 5 x 6 block layout:

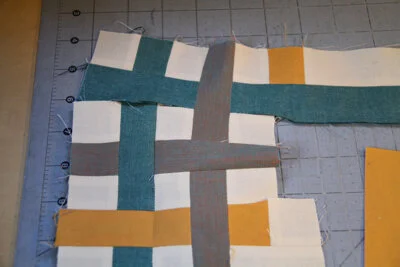
Here is the block I made with different fabrics:
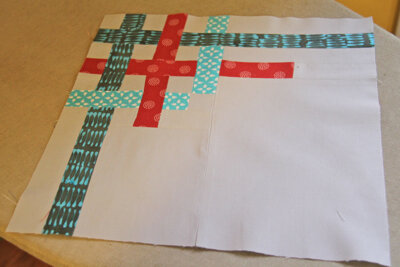
The fabrics I used are:
Fabric A: Short Row Steel ~ A Stitch In Color
Fabric B: Ava's Apron Cherry ~ Reunion
Fabric C: Foulard Aqua ~ Washi
Fabric D: Kona Cotton - Ash
