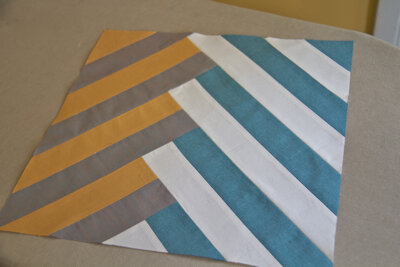
Block #7
This block design does not include any negative space. As a result, I think that the pattern the block makes shines when pieced with small scale prints or solid fabrics.

FABRIC REQUIREMENTS FOR ONE BLOCK
One block finishes 12.5” square.
Based on fabrics that are 42” wide:
Fabric A: (Crossweave - Blue Blue) 2” wide width of fabric (WOF) strip and a 2” x 5.5” scrap
Fabric B: (Kona Cotton - Bone) 2” wide WOF strip and 2” x 5.5” scrap
Fabric C: (Shot Cotton – Galvanized) 2” wide WOF strip
Fabric D: (Kona Cotton Butterscotch) 2” wide WOF strip and 7” x 3” scrap
Note that if you don’t have a long strip of one of the fabrics you’d like to use you can use scraps. Please refer to the cut list below to know how big they must be.
BLOCK NUMBERS FOR QUILTS:
Large Baby Quilt: 48” x 60”: make 20 blocks
Arrange in a 4 x 5 block grid
Lap Quilt: 60” x 72” make 30 blocks
Arrange in a 5 x 6 block grid
Queen Sized Quilt: 96” x 96” make 64 blocks
Arrange in an 8 x 8 block grid
CUTTING INSTRUCTIONS:
1. Sew together the A & B WOF strips and the A & B 5.5” scraps.
2. Cut 7” off of the Fabric C WOF strip and sew together with the 7”X 3” scrap of Fabric D. This is Portion 9.
3. Sew together the remainder of the Fabric C WOF strip with the Fabric D WOF strip.

4. Cut the A/B strip into portions of the following lengths:

Portion 1: 5.5”
Portion 2: 9.5”
Portion 3: 12”
Portion 4: 12”
Portion 5: 5.5”
5. Cut the C/D strip into portions of the following lengths:
Portion 6: 7.5”
Portion 7: 10”
Portion 8: 10’”
Portion 9 is already at the correct size
ASSEMBLING THE BLOCK
Always use a ¼” seam allowance while piecing.

6. Sew together portion 1 and 6 as indicated

7. Keep building the block by adding on portion 2.

8. Following this same building pattern, switch from side to side as you sew on portion 7, then 3, then 8, and finally 4. Press after you sew on each portion.

9. Next, finish the piecing by sewing on portions 9 and 5. Line them up so that portion 9 is set 2” down from the top of the piecing and portion 5 is set 3” in from the left edge of the piecing.
10. Now, finish the block by first rotating your piecing and then trimming it down to 12.5” square. Your block is all done!
Tip: This is just the sort of trimming that having a 12.5” square ruler comes in handy for. If you don’t have one, I’d suggest you draw the 12.5” block onto the piecing before cutting it out. You wouldn’t want to trim too much off of one edge and not have enough piecing remaining to fit the full sized block.

I created some digital quilts using this block in a 5 x 6 block layout:

Here is the block I made with different fabrics:

The fabrics I used are:
Fabric A: Motherboard Black-Mechanical Genius
Fabric B: Kona Cotton - Medium Grey
Fabric C: Snakeskin Green - Backyard Baby
Fabric D: Garden Spiral Apricot-Monkey's Bizness
