Block #6
Here we go, the next block for the Modern Block of the Month! Can you believe that we’re already half way along?
This time around we’re going to tackle some paper piecing. This block design uses perspective and the easiest way to get the perfect sizes for the angled piecing is to sew it using the template included here. If this is your first time paper piecing, don’t be daunted! It’s really quite simple once you get your head around how it works.

BLOCK NUMBERS FOR QUILTS:
Large Baby Quilt: 48” x 60”: make 20 blocks
Arrange in a 4 x 5 block grid
Lap Quilt: 60” x 72” make 30 blocks
Arrange in a 5 x 6 block grid
Queen Sized Quilt: 96” x 96” make 64 blocks
Arrange in an 8 x 8 block grid
FABRIC REQUIREMENTS FOR ONE BLOCK
One block finishes 12.5” square.
Fabric A: (Kona Cotton Bone) 13” x 9” rectangle
Fabric B: (Kona Cotton Butterscotch) 6.5” x 9” rectangle
Fabric C: (Crossweave Blue Blue) 6.5” x 9” rectangle
Fabric D: (Shot Cotton – Galvanized) 6.5” x 9” rectangle
CUT LIST:
A1 = 1.5” x 9”
A2 = 1.5” x 9”
A3 = 1.5” x 9”
A4 = scrap that is at least 2.5” x 2
A5 = scrap that is at least 1.5” x 8”
A6 = scrap that is at least 1.5” x 8”
A7 = scrap that is at least 4” x 6”
B1 = 3.5” x 9”
B2 = scrap that is at least 3” x 7”
C1 = 3.5” x 9”
C2 = scrap that is at least 3” x 9”
D1 = 3.5” x 9”
D2 = scrap that is at least 3” x 9”

ASSEMBLING THE BLOCK
Always use a ¼” seam allowance while piecing.
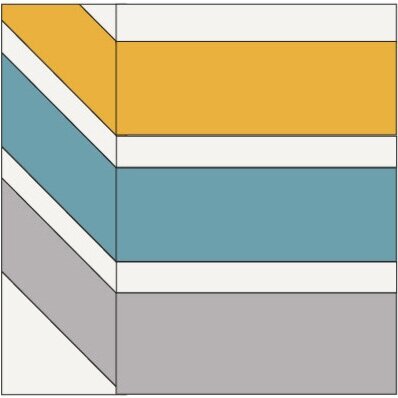
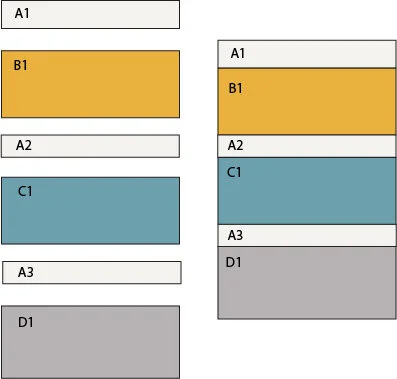
Sew together A1, B1, A2, C1, A3 and D1 as pictured. It is very important that you sew this portion with a uniform ¼” seam allowance for the block to all line up as it should.
2. Print out the paper piecing template. You can download it here.
This is a great way to use up that scrap paper you have lying around!! When you print, make sure that you aren’t scaling the image at all and that it will print out full size (4” x 12.5”) on two pieces of paper. In Adobe Reader you’ll need to select “tile large pages” under Page Scaling in the print window. (This is on my Mac – I’m sorry if it’s different on your PC.)


3. Cut out the two portions of the template and tape them together. It should be easy to see how the two pieces line up – the will overlap a bit.
4. Now, set the stitch length on your sewing machine to shorter than you usually sew with. This will make your needle perforate the paper more when you’re sewing and the paper will be easier to tear out once you are finished.
The idea with paper piecing like this is that rather than cut and sew your fabric to very specific sizes, if you use large enough scraps and sew on the lines on the template, then you’re sewing to those very specific sizes.

5. Now take your scraps for A4 and B2 and overlap them so that they sit at least a ¼” over the line you’re going to sew on. Make sure that B2 is arranged so that it will cover all of the B2 section on the template once you flip and press it down.

6. Sew them on, following the line on the template. I find that turning fabric and the template over when you sew works the best as the fabric covers the line. When it’s turned over, you can see the line through the paper. This is the only step in which you’ll sew two pieces on at once. From here, you’ll sew on the next pieces one at a time, right sides together so that when you flip and press down the piece you just sewed on, it covers the correct portion of the template.

7. Flip and press down your B2 scrap.
8. Continue sewing on A5, C2, A6, D2 and A7, always sewing directly along the lines on the template. Before you sew on the fabric pieces, make sure you arrange them so that when they are flipped down they will cover all of the portion of the template that they should. With this method of piecing you don’t need to worry about ¼” seam allowances, but don’t let them get smaller than a ¼”.

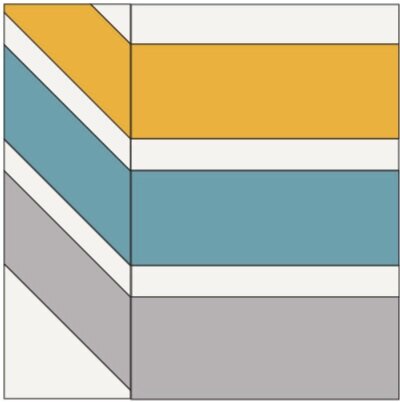
9. When you are done, your piecing will look like this:

10. Now use the paper template to trim your piecing down to an exact 4” x 12.5” rectangle. When you do this you will be cutting some bias edges into your fabric so take care to not stretch or pull this piecing at all. It can warp easily.

11. Next remove all of the paper on the back of your piecing. This is the point where you’ll be happy you decreased your stitch length!

12. You’ll notice that with this type of piecing, your seam allowances can be much bigger than a ¼”. Feel free to trim them down at this point if you’d like to. Again, take care that you don’t pull on the bias edges of the piecing and warp it as you do this.

Your paper piecing is done!

13. Sew your first A1/B1/A2/C1/A3/D1 to your paper pieced portion. Again, it is important to use a ¼” seam allowance for this seam.
You’ll notice that it looks like the piecing won’t line up, but the ¼” seam allowance you sew the two portions together with will eat up that discrepancy, making them line up just right. Pin this seam thoroughly before sewing it to make sure that your seams and piecing will match up correctly.
Note that it looks like the gray on the bottom doesn’t line up, but when you sew the block into sashing, or to other blocks, that small ¼” of grey will disappear into the seam.
I created some digital quilts using this block in a 5 x 6 block layout:

Here is the block I made with different fabrics:

The fabrics I used are:
Fabric A: Kona Cotton Zucchini
Fabric B: Path Grey ~ Woodland
Fabric C: Pixie Rings Garden ~ Stitch
Fabric D: Bubble Dot Blue ~ Catch of the Day
