Block #5
This month we’ll tackle some more strips on the diagonal!


BLOCK NUMBERS FOR QUILTS:
Large Baby Quilt: 48” x 60”: make 20 blocks
Arrange in a 4 x 5 block grid
Lap Quilt: 60” x 72” make 30 blocks
Arrange in a 5 x 6 block grid
Queen Sized Quilt: 96” x 96” make 64 blocks
Arrange in an 8 x 8 block grid
FABRIC REQUIREMENTS FOR ONE BLOCK
One block finishes 12.5” square.
Fabric A: (Kona Cotton Bone) 6” WOF strip
Fabric B: (Kona Cotton Butterscotch) 3” x 20” scrap
Fabric C: (Crossweave Blue Blue) 2” x 20” scrap
Fabric D: (Shot Cotton – Galvanized) 3” x 20” scrap
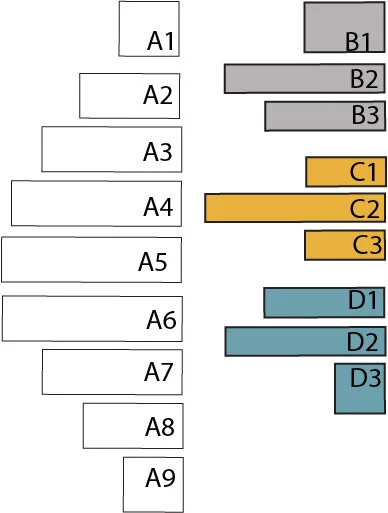
CUT LIST:
A1 = 3.5” x 3.25”
A2 = 5.5” x 2.75”
A3 = 7.5” x 2.75”
A4 = 9” x 2.75”
A5 = 9.5” x 2.75”
A6 = 9.5” x 2.75”
A7 = 7.5” x 2.75”
A8 = 5.5” x 2.75”
A9 = 3.5” x 3.25”
B1 = 4.5” x 3”
B2 = 8.5” x 2”
B3 = 6.5” x 2”
C1 = 4.5” x 2”
C2 = 9.5” x 2”
C3 = 4.5” x 2”
D1 = 6.5” x 2”
D2 = 8.5” x 2”
D3 = 3” x 3”
ASSEMBLING THE BLOCK
Always use a ¼” seam allowance while piecing.
1. Sew together two columns of piecing as pictured in the diagram.


2. Sew the two columns of piecing together, lining up the colorful strips so that they are centered in the background fabric (Fabric A) strips from the opposite column.


3. Now turn the piecing at a 45 degree angle and trim down to 12.5” square. Make sure that your upper left and lower right corners fall on the center seam of the piecing.
TIP: This is another block that having a 12.5” square ruler is ideal for.If you don’t have a ruler like that consider drawing the block onto the piecing before making your first cut.You wouldn’t want to cut one edge incorrectly and not be able to get a full 12.5” square block out of the piecing.
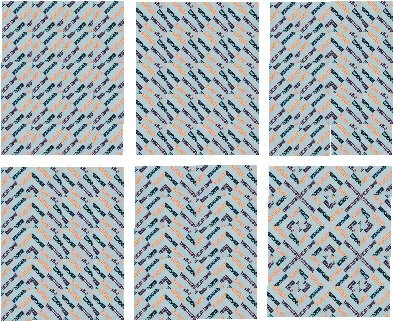
I created some digital quilts using this block in a 5 x 6 block layout:

Here is the block made with different fabrics:

The fabrics I used are:
Fabric A: Kona Cotton Aqua
Fabric B: Sparkle Midnight - Lark
Fabric C: Ruta Navy - Echo
Fabric D: Eggs in a Row Yellow – Pear Tree