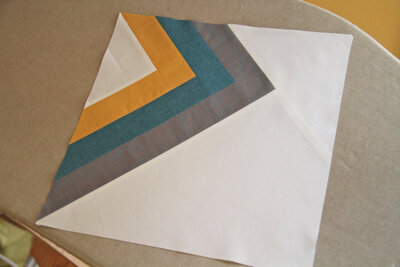
Block #4
Time to dive into the next block for the Modern BOM! This block certainly isn’t the most economical with your fabric, but its graphic appeal is worth it. If you make a lot of these blocks, keep all of your matching scraps for another quilt!
BLOCK NUMBERS FOR QUILTS:
Large Baby Quilt: 48” x 60”: make 20 blocks
Arrange in a 4 x 5 block grid
Lap Quilt: 60” x 72” make 30 blocks
Arrange in a 5 x 6 block grid
Queen Sized Quilt: 96” x 96” make 64 blocks
Arrange in an 8 x 8 block grid
FABRIC REQUIREMENTS FOR ONE BLOCK
One block finishes 12.5” square.
Fabric A: (Kona Cotton Bone) ¼” yard
Fabric B: (Kona Cotton Butterscotch) 2” x 13” scrap
Fabric C: (Crossweave Blue Blue) 2” x 17” scrap
Fabric D: (Shot Cotton – Galvanized) 2” x 20” scrap
CUT LIST:
A1 = 9.5” x 5.5”
A2 = 5” x 5”
A3 = 9” x 13” (if you have a wider piece of fabric than an exact ¼” yard, cutting this to 10” x 13” gives you more wiggle room for the final step of cutting out your block)
B1 = 6.5” x 2”
B2 = 2” x 6.5”
C1 = 6.5” x 2”
C2 = 2” x 10”
D1 = 6.5” x 2”
D2 = 2” x 13”

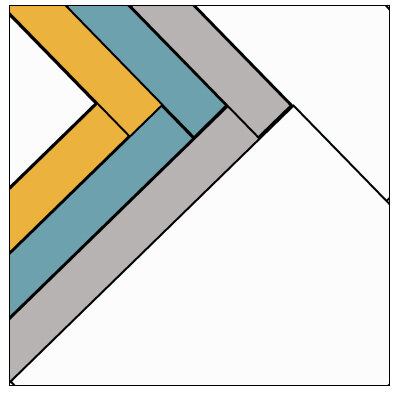
ASSEMBLING THE BLOCK
Always use a ¼” seam allowance while piecing.
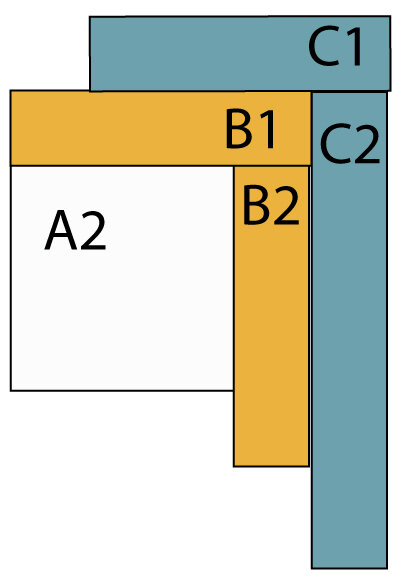
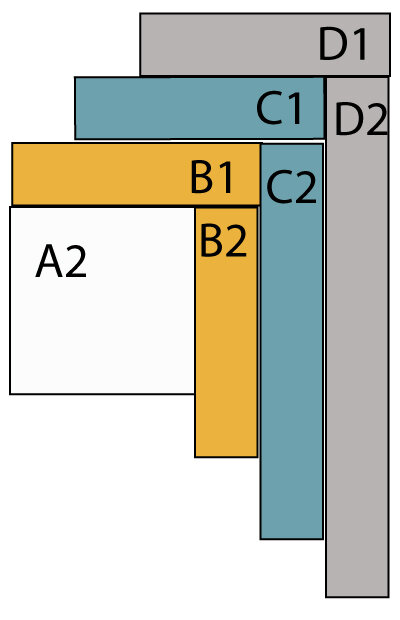
Building on A2, assemble your block.

1. First sew B2 onto A2, press the seam and sew B1 onto the top of this piecing. Press.
2. Next sew C2 onto the piecing, press and sew C1 onto the top of the piecing. Press.

3. Sew D2 onto the piecing, press and sew D1 onto the top of the piecing. Press.
4. Sew A3 onto the right side of your piecing. Press.

5. Sew A1 onto the top of the piecing, taking care that you line it up 1.5” from the left edge of D1.

6. Cutting out the finished block is the final step. Take care that you know where all four sides of your block fall, so that you can get the right sized block out of the piecing.

This is just the sort of block that having a 12.5” square ruler is ideal for. If you don’t have a ruler like this consider drawing the block onto the piecing before making your first cut. You wouldn’t want to cut one edge incorrectly and not be able to get a full 12.5” square block out of the piecing.
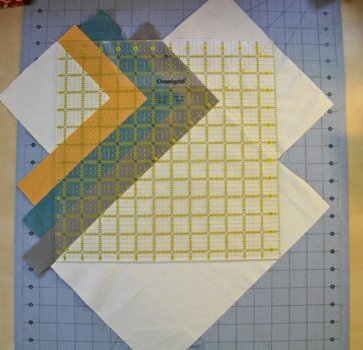
Make sure that your corners fall on the outer edge of Fabric B in the upper left corner of your block, and on the inner edge of Fabric D in the lower left corner.

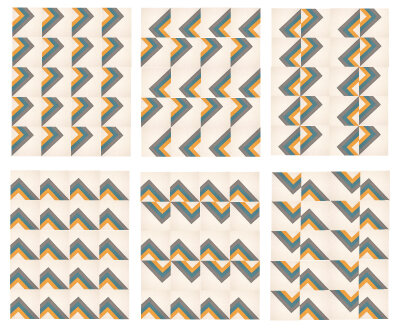
I created some digital quilts using this block in a 5 x 6 block layout:
Here is the block made with different fabrics. In honor of Handmade Holidays I went ahead and used a red and green color scheme! I also created some digital quilts using this block in a 5 x 6 block layout:

The fabrics I used are:
Fabric A: Kona Cotton Red
Fabric B: Kei Honeycomb Green
Fabric C: Kei Honeycomb Red
Fabric D: Kona Cotton Grass Green
