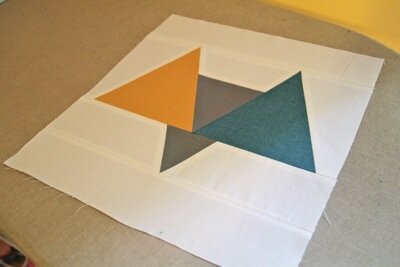
Block #3
This month we’re going to be working with some triangles! Be careful not to stretch or tug your fabric once you’ve cut out the triangles because it’s easy to stretch those bias (diagonal across the grain) cuts.

BLOCK NUMBERS FOR QUILTS:
Large Baby Quilt: 48” x 60”: make 20 blocks
Arrange in a 4 x 5 block grid
Lap Quilt: 60” x 72” make 30 blocks
Arrange in a 5 x 6 block grid
Queen Sized Quilt: 96” x 96” make 64 blocks
Arrange in an 8 x 8 block grid
FABRIC REQUIREMENTS FOR ONE BLOCK
One block finishes 12.5” square.
Fabric A: (Kona Cotton Bone) ¼ yard
Fabric B: (Shot Cotton – Galvanized) one 4 ¼” square and one 3 ¼” square
Fabric C: (Kona Cotton Butterscotch) one 6 ¼” square
Fabric D: (Crossweave Blue Blue) one 6 ¼” square
CUT LIST:
A1 & A2 = 12 ½” x 3”
A3 & A4 = 4 ½” x 6”
A5 = 7” x 2 ½”
A6 & A8 = 7” x 3”
B1 = 4 ¼” x 4 ¼”
B2 = 3 ¼” x 3 ¼”
C1 = 6 ¼” x 6 ¼”
D1 = 6 ¼” x 6 ¼”

The pieces will be used in this lay out:

CUTTING OUT THE TRIANGLES:

1. Stack C1 and D1. Line the square up on your cutting mat so that it’s centered with 3 1/8” on either side of a line. Use your ruler to cut from the bottom left corner to the top center. Repeat to cut the other side of the square into a triangle.
2. Repeat for B2 but the square is smaller so you’ll center it with 1 3/8” on either side of the cutting mat line.
Tip: if you’re going to make many of these blocks, you can cut out one triangle using this method. Once you have that triangle, use it as a template on a 6 ¼”” strip of fabric (for the bigger Fabric C & D triangles) and on 3 ¼” and 4 ¼” strips for the smaller Fabric B triangles.
3. The final triangle is made with two fabrics. Sew together A5 and B1, centering A5 over B1. Like the previous triangles, and trim both the left and right sides by centering B1 over a line on your mat (2 1/8” on either side of the line) and trim using the outside corners of B1 as a guide.

ASSEMBLING THE BLOCK
Always use a ¼” seam allowance while piecing.

1. Using C1 and D1 as templates, trim the sides of A3 and A4 as pictured.
2. Sew A3 to C1 and A4 to D1. Take care to sew to the correct edge of each triangle and make sure to line up the tips of the triangles at the tops of A3 and A4.
C1 and D1 are a ¼” longer than A3 and A4. After you sew them together and press, they should line up along the bottom edge.
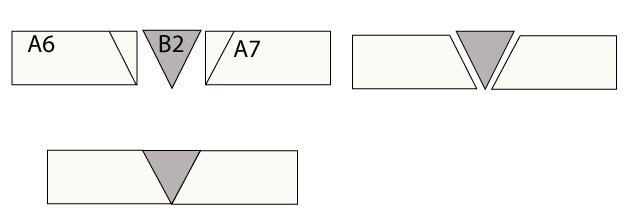
3. Using B2 as a template, trim A6 and A7 as pictured.
4. Sew A6 and A7 to either side of B2 taking care to line up the tip of the triangle with the bottoms of A6 and A7. I suggest pressing your seams open between each seam you sew and this gives you the tips of seam allowances to use as you line up your piecing.

5. Assemble the three larger triangles into a strip, pressing between steps. Make sure you line up the bottom edges of your C1 and D1 portions with the tip of the center triangle.

6. Now working top to bottom, assemble A1, the big triangles strip, the little triangle strip and A2. The triangle strips will be a bit wider than 12.5” so be sure to center everything carefully.
Trim the block to 12.5” square and you’re finished!
I created some digital quilts using this block in a 5 x 6 block layout:

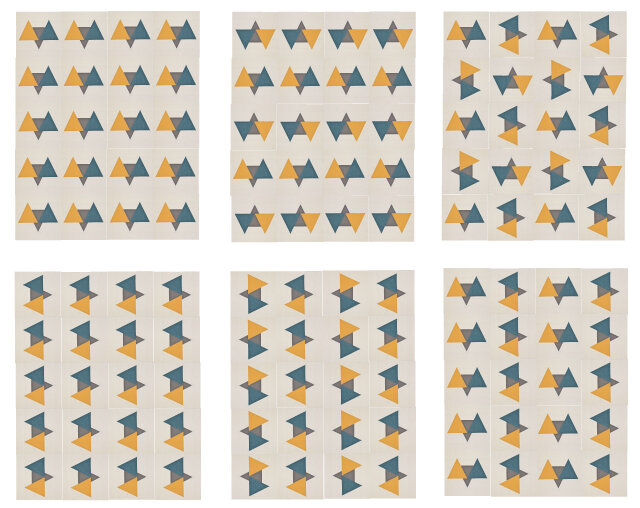
Here is the block made with different fabrics, and more digital quilts with these fabrics:

The fabrics I used are:
Fabric A, Kona Ash
Fabric B, Meadow Gray
Fabric C, Cobblestone Stripe Coral
Fabric D, Falling Flowers Aqua
