Block #12
It’s time for the 12th and final block in this Modern Block of the Month! This month we’ll tackle a relatively simple block but it involves triangles, which means cutting some of the fabric on the bias (across the grain), so take care to not tug on edges of the triangles as you’re working with them. It’s very easy to stretch and warp the fabric when it’s cut on the bias, so be mindful of that.
This block is simple, but leads to really great graphic quilt layouts.


FABRIC REQUIREMENTS FOR ONE BLOCK
One block finishes 12.5” square.
Fabric A: (Shot Cotton – Galvanized) 12” square
Fabric B: (Kona Cotton - Bone) 6.5” wide WOF strip
Fabric C: (Crossweave - Blue Blue) 6” x 3.5” scrap
Fabric D: (Kona Cotton - Butterscotch) 6” x 3.5” scrap
BLOCK NUMBERS FOR QUILTS:
Large Baby Quilt: 48” x 60”: make 20 blocks
Arrange in a 4 x 5 block grid
Lap Quilt: 60” x 72” make 30 blocks
Arrange in a 5 x 6 block grid
Queen Sized Quilt: 96” x 96” make 64 blocks
Arrange in an 8 x 8 block grid
CUT LIST & INSTRUCTIONS:
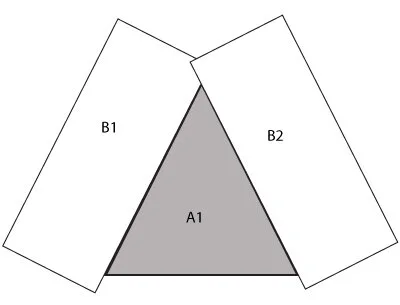
A1 = Triangle from 12” square, see directions.
B1 = 6.5” x 16”
B2 = 6.5” x 16”
C1 = 6” x 3.5”
D1 = 6” x 3.5”
To cut out A1:
1. Fold the 12” x 12” square in half.
2. Cutting from one corner to the other along the line as indicated on the diagram and trim the square into a triangle (A1).
TIP: If you’re making a lot of these blocks, you can cut out one triangle this way. Then, you can use it as a template to cut out many more triangles out of a 12” WOF strip. This will help you avoid a lot of wasted fabric.

ASSEMBLING THE BLOCK
Always use a ¼” seam allowance while piecing and press between every step.

1. Sew B1 to one edge of A1. When you line up the ends of B1 center the extra length on either end. Be sure to press after this step. I prefer to press my seams open, but it’s up to you.
2. Sew B2 onto the other long edge of A1, again being sure to center the extra length of B2.

3. Using a 12.5” ruler (Don’t have one yet? You can use a normal ruler, just be sure to not cut too much off of one side of the piecing) square up the block. Use the bottom edge of A1 as a guide and keep A1 centered in the block.

4. With right sides of fabric together (so the wrong side of C1 will show) line up C1 with the upper left corner of your squared up piecing, making sure that you’ve lined the edges up so that they meet 3.75” in and down from the corner.
5. Sew on C1.
6. Repeat this process for with D1 on the upper right corner.
7. Trim off the extra B background fabric, and press C1 and D1 up.

8. Now trim C1 and D1 to square up the 12.5” block and you’re all finished!
I put together some digital quilts showing you a number of different layouts with this block:

I also sewed the block up in different fabrics.


The fabrics I used are:
Fabric A: Kona Cotton - Ivory
Fabric B: Flip Flop Pink Bikini - Lucy's Crab Shack
Fabric C: Lime - Full Moon Dot
Fabric D: Sari Gray - Maasai Mara
Thanks so much to all of you who have participated in the Modern BOM!! It’s been wonderful seeing all of the blocks sewn up by so many different people.