Block #10
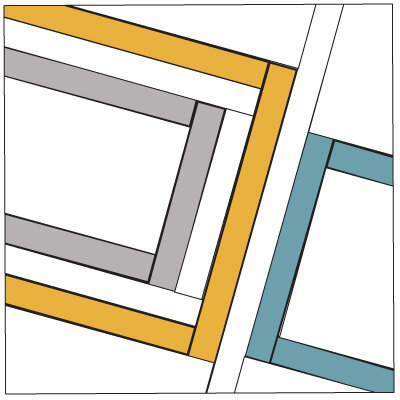
Up next we have a fun asymmetrical block with lots of negative space can be arranged any number of ways to create a bold graphic quilt.

FABRIC REQUIREMENTS FOR ONE BLOCK
One block finishes 12.5” square.
Fabric A (Kona Cotton Bone): ¼ yard
Fabric B (Kona Cotton Butterscotch): 1.5” wide scrap, at least 29” long
Fabric C (Shot Cotton – Galvanized): 1.5” wide scrap, at least 22” long
Fabric D (Crossweave Blue Blue): 1.5” wide scrap, at least 17.5” long
BLOCK NUMBERS FOR QUILTS:
Large Baby Quilt: 48” x 60”: make 20 blocks
Arrange in a 4 x 5 block grid
Lap Quilt: 60” x 72” make 30 blocks
Arrange in a 5 x 6 block grid
Queen Sized Quilt: 96” x 96” make 64 blocks
Arrange in an 8 x 8 block grid
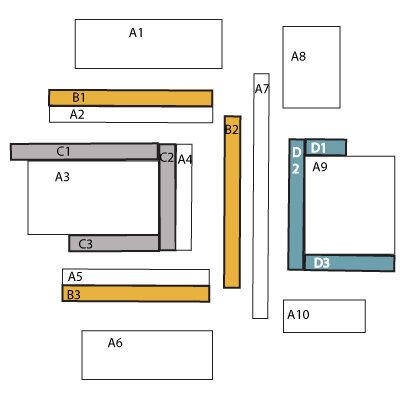
CUT LIST:
A1 = 9.5” x 3.5”
A2 = 10.5” x 1.5”
A3 = 8.5” x 5”
A4 = 1.5” x 7”
A5 = 7.5” x 1.5”
A6 = 8.5” x 4.5”
A7 = 1.5” x 15.5”
A8 = 4” x 5.5”
A9 = 6” x 6.5”
A10 = 5.5” x 2.5”
B1 = 10.5” x 1.5”
B2 = 1.5” x 11”
B3 = 7.5” x 1.5”
C1 = 9” x 1.5”
C2 = 1.5” x 7”
C3 = 6” x 1.5”
D1 = 3” x 1.5”
D2 = 1.5” x 8.5”
D3 = 6” x 1.5”

ASSEMBLING THE BLOCK
Always use a ¼” seam allowance while piecing and press between every step.

1. Sew together B1 & A2.
2. Sew together A5 & B3.
3. Sew together C2 & A4.
4. Sew together C1 & A3 & C3.
5. Sew together D1 & A9 & D3.
6. Sew C1/A3/C3 to C2/A4.
7. Sew D2 to D1/A9/D3.

8. Sew B1/A2 to the top of C1/A3/C3/C2/A4 and A5/B3 to the bottom of it.
9. Sew A8 to the top of D1/A9/D3/D2 and A10 to the bottom of it.

10. Sew B2 to the right side of your piecing from step 8.
11. Sew A7 to the left side of your piecing from step 9
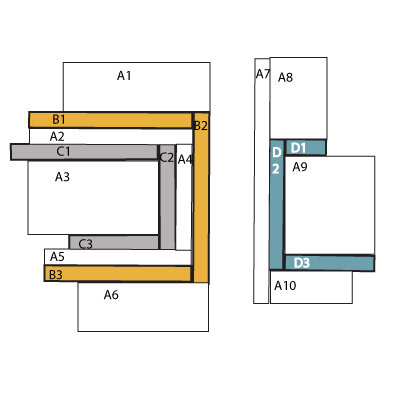
12. Sew A1 to the top of your piecing from step 10 and A6 to the bottom of it.

13. Assemble the two piecing portions together, lining them up at the top.
14. Using a 12.5” ruler, if you have one, square up the block at an angle as pictured. Be sure to get the upper left corner in the A fabric and the lower right in the C fabric.
If you don’t have a 12.5” ruler, consider drawing your cut lines before making a cut. You don’t want to cut one side and realize you’ve cut too much off to get a full block out of the piecing.

I put together some digital quilts showing you a number of different layouts with this block:

I also sewed the block up in different fabrics.

The fabrics I used are:
I went with a Denyse Schmidt mix with:
Fabric A: Kona Cotton Coal
Fabric B: Hope Valley – Prairie Rose Fiesta
Fabric C: Hope Valley - Canyon Stripe Fiesta
Fabric D: Flea Market Fancy – Pink Seeds
