A little while back, I mentioned that I'd be posting the pattern for the Sparks Baby Quilt. Here it finally is! I've learned that writing up patterns feels like real homework to me... no fun! But I do want to start doing it more. I feel like the more I do it, the easier it will get.
Let me preface by saying that I hope that this pattern works out for you. It's the first quilt pattern I've written up and I'm generally not someone who follows patterns. I wouldn't be surprised if there's mistakes and/or confusions. Please drop me a note or comment if you have thoughts or suggestions for changes. Also, do let me know if you make the quilt! I would love to see your results.
Ok - here's the pattern!
The finished quilt measures 46.5" x 60"
Needed Fabric:
Blocks - all of mine are different fabrics, but that's up to you! - 20 3.5" square centers - 20 frame sides, 3.5" x 6" - 20 frame tops and bottoms, 8.5" x 6"
Sashing - I used off white Kona cotton: - 15 strips of 2.5" x 8.5" - 4 strips of 2.5" x 38.5“
Border - I used off white Kona cotton: -2 strips of 4.5" X 48.5” for side border -2 strips of 6.5" x 46.5” for top and bottom border
CUTTING:
Let's do the easy part first.
Cut the sashing and border

Sashing: 15 strips of 2.5" x 8.5" 4 strips of 2.5" x 38.5“
Border: 2 strips of 4.5" X 48.5” for side border 2 strips of 6.5" x 46.5” for top and bottom border
Then, cut out the fabric for the blocks
Cut centers: -20 centers, 3.5" square.
For my centers I did lots of fussy cutting. After measuring and cutting my first square, I like to then use it as a template for cutting out the rest of the centers. Some people hate templates, but I find them helpful for fussy cutting.

Using the template makes it easier for me to see which part of the fabric I want to cut out. Make sure to use the same square as the template all along, and not to trim its edges as you go. You don’t want the squares you are cutting to gradually change a bit in size.
Cut frames: - 20 frame sides, 3.5" x 6" - 20 frame tops and bottoms, 8.5" x 6"

Next, cut the fabric for the block frames in two.
I do it randomly, but first I lay them out and do some design planning before I decide which squares will be cut which way. Here the fabric is stuck up on my (tri-colored, yes it's just three pieces of felt!) design wall so that I see how it will all look.

There are a couple of things I consider before cutting the fabric for the frames in two. I wouldn’t want to find down the road that all of my oranges have the center in the upper right. Or all of the blocks that I want on the left edge of the quilt have centered centers. That's wordy, but I hope you see what I mean.
Also, keep in mind that some of your blocks have a right side up (unless you didn’t fussy cut) – so you can’t flip them around later to change the position of the center.
If you aren't comfortable cutting the frames randomly, I have broken it down like this:

8 blocks - off set top & bottom, off set sides - Cut 8 of the 3.5" x 6" down to 3.5" x 2.5" & 3.5" x 3.5" - Cut 8 of 8.5" x 6" down to 8.5" x 2.5" & 8.5" x 3.5"
When piecing these 8 blocks put: - 2 centers in upper left - 2 centers in lower left - 2 centers in upper right - 2 centers in lower right
4 blocks - off set top & bottom, centered sides: Cut four 3.5" x 6" strips down to 3.5" x 3" and 3.5" x 3" Cut four 8.5" x 6" strips down to 8.5" x 2.5" and 8.5" x 3.5"
When piecing these 4 blocks put: 2 centers higher in the block 2 centers lower in the block
4 Blocks - centered top & bottom, off set sides Cut four of the 3" x 6" strips down to 3.5" x 2.5" and 3.5" x 3.5" Cut four of 8.5" x 6" down to 8.5" x 3" and 8.5" x 3"
When piecing these four blocks put: 2 centers to the left 2 centers to the right
4 Blocks - centered top & bottom, centered sides Cut four of the 3" x 6" down to 3.5" x 3" and 3.5" x 3" Cut 4 of 8.5" x 6" down to 8.5" x 3" and 8.5" x 3"
All four of these blocks are pieced the same way.
PIECING:
Piece all the blocks, randomly or as indicated above.


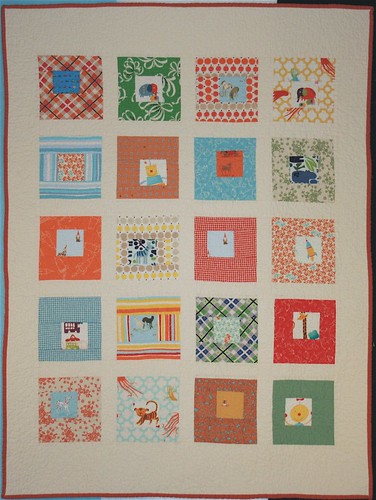
Here are all of my pieced blocks:

Next, piece the sashing.
First attach the blocks to one another with the fifteen strips of 2.5" x 8.5" until they are put together in 5 rows.


Then continue by attaching all the rows to each other with the four strips of 2.5" x 38.5“.


Finally, piece the border.

First sew on the sides, the 2 strips of 4.5" X 48.5”.

Then sew on the top and bottom, the 2 strips of 6.5" x 46.5”.
Congratulations! You have a finished quilt top!

From here, if you need to, check out this post for links on how to baste, quilt and bind! Hope that you enjoyed the pattern!